Category Archives: Guns/Self Defense

Should I Add An Air Rifle To My Prepper Arsenal?

I consider myself among the very fortunate because I had an opportunity to grow up going to a hunting camp where I got to enjoy so many outdoor activities that are often foreign to many boys and young men. While I had visited to fish in the two lakes there since I was 5, my first trip to deer camp during hunting season was when I was 8. After we arrived that day and got settled in, my father presented my with my first BB gun, a Daisy lever action, similar the the Red Ryder carbine made famous in A Christmas Story. My father had grossly underestimated the amount of time I could spend shooting beer cans off a saw horse and the two packs of Daisy Quicksilver BB’s were gone in a matter of hours. I still have that gun and it’s still pressed into service from time to time to discourage wayward scavengers from getting in the garbage or digging in the grass near the house.

While I can only hope that most of you have had some sort of similar experience, it’s far from too late to get in on the game of air rifles. I’m going to mention a few in this post and some of the benefits of having one handy, but I still encourage everyone to read my post on gun safety. Air guns are often viewed as toys but are potentially deadly and, in many cases, more likely to injure a shooter with a ricochet because of the low velocity. I have personally been hit almost directly in the tear duct with a ricocheted BB and that was close enough to being blind for me! Click Here to read about the important safety rules that should always be followed when handling any type of gun and be especially conscious of hard targets and ricochets.

Types of Air Guns

I never put much thought into how air rifles worked until several years ago when I started shooting competitively. While we were shooting rimfire silhouette matches, several of the shooters mentioned that they were going to have an air rifle side match later that day. I asked about what air rifles they used and they started explaining the various classes and designs and I suddenly realized I didn’t know very much at all. After some research, I have narrowed it down to a few categories of air guns that we may want to consider adding to our arsenals, as well as noting what I think are the best ones for the job.

Springer Style Air Guns

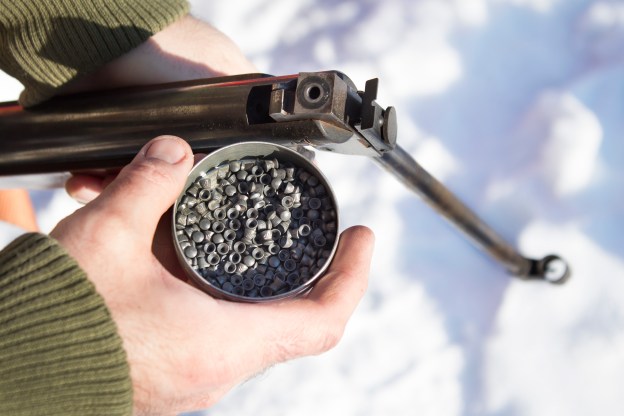
Springer fired air guns are fired by compressing a spring that has a plunger on it which slams forwards when the trigger is released forcing a small amount of air through a port at a high pressure, thereby pushing the BB or pellet out of the barrel. These are some of the simplest and most inexpensive air guns that we can purchase, as well as some of the most practical for prepping purposes.

The practicality comes from the fact that the guns are self contained and only require one pump or break-open action to cock them and have them ready to fire. While BB versions are limited in accuracy and velocity by the smooth bore of the gun, pellet rifles can shoot much faster and with much more accuracy. The comparison is much the same to that of the blunderbuss vs. the black powder rifles. Rifling imparts a spin to the projectile that stabilizes it in flight. The only drawbacks to using a spring operated air rifle is that there is only one shot per cocking motion and it can take significant energy to cock them so follow up shots are almost impossible when hunting.

Regardless of the limits of having only one shot at a time, I personally believe that this is the best option for us as preppers since it is simple, inexpensive and can shoot at velocities near that of some rimfire and pistol ammunition but without anywhere near the cost or need for ammo. For the sake of this post, I have included break barrel gas piston guns into this category. They function the same, however it a compressed gas piston that gets pressed instead of a spring to force air through the chamber. You can pick up a good quality rifle by clicking the picture below.

Precharged Pneumatic Air Rifles

Precharged Air rifles are the next level in accuracy and consistency for match shooters. By using pumps or compressed air tanks to fill up the onboard air chamber, the shooter prepares the rifle for repeated shots. A regulator allows a set amount of pressure to enter the chamber with each shot and this keeps the velocity consistent, which is a huge boost to accuracy. Another benefit to these rifles is the fact that many are repeaters, meaning they are capable of holding multiple pellets and can be fired repeatedly by simply cycling of the bolt or action.

In preparing for a disaster situation, we need to consider access to consumables and this applies to air guns too. Precharged pneumatic airguns not only require the pellets, they also require an external air source. Many are designed to fill from high pressure scuba tanks. These might not be the best choice for prepping as we may have limited availability to the equipment needed to refill them. Other versions are charged with a hand pump that looks similar to a bicycle pump, but is able to produce much more pressure. If you are interested in one of the latter types, click the picture below to have a closer look.

Variable Pump Air Guns

My second air gun was a Crossman pellet rifle that fired from a variable pump action. These work well and offer some degree of control by the shooter when it comes to the velocity of the pellet. We can add more velocity to the pellet by pumping the fore end lever more times, thereby building more pressure in the air chamber. While this is a beneficial ability, we need to keep in mind that consistency is the mother of accuracy. I would recommend that we determine an optimum number of pumps for our uses and adjust our sites to be zeroed at that velocity then use the same number of pumps for every shot.

The only real drawbacks of variable pump air guns is the need to pump the cylinder up between shots. Because of this, variable pumps have the same slow follow up shot timing as the springer style and may mean we only have one chance to bag that squirrel or rabbit we need to have something for dinner. For a good shooting, inexpensive model, click the picture below.

CO2 Air Guns

The last type of air gun that I’d like to mention in this post is the CO2 powered air rifle or air pistol. These are powered by small cartridges of compressed carbon dioxide that is forced through the chamber to force the pellet or BB out of the barrel and down range. They are handy and fun to shoot since they function much like a semi automatic pistol or rifle would and some are even designed to operate the slide or bolt in a way that makes them feel and function in a similar manner as their cartridge fired counterparts.

While they are lots of fun, CO2 guns rely on small disposable cartridges that don’t last very long. If you chose one of these guns, it will be necessary to have and ample supply of these cartridges along with the pellets or BB’s you plan to shoot. Even with that drawback, I do consider them useful to us in one aspect. The small cylinder size allows pellet pistols to be made as near replicas of cartridge fired side arms and can be used for quiet indoor practice, if you have some form pellet trap assembled to catch the projectile safely. Click here for one that is a close copy of my daily carry gun.

Air Rifles For Big Game Hunting

While I have not been following the trend closely, there has been a great deal of technological advancement in bigger bore air rifles in the last several years, but they aren’t new by any means. Lewis and Clark even carried one on their expedition across North America and it may have been the deadliest gun they had! I have yet to try one and see the true effectiveness of these, however some of the bullet weights and velocities that are advertised are almost that of centerfire pistol ammunition and can easily take down medium to large game within certain ranges and with proper shot placement. Without any experience in the area I won’t offer a recommendation on a particular gun, however this book may help you learn more about what to expect should you decide to add a big bore or any size air rifle to your arsenal for hunting.

Other Considerations When Shooting Air Rifles

Again, I want to stress that these are not toys, but there are some other considerations that make air guns a little different. One of the most important differences is the design of the accessories, especially telescopic sights. Although there is very little recoil from air rifles, many of them actually recoil away from the shooter when the spring or piston releases. Most scopes designed for cartridge fed guns are designed to absorb recoil against the shooter and can be damaged and fail if used on an air rifle. Making sure that the sights and accessories you chose are made for your particular type of air rifle can save you from expensive repairs later on.

Disclosure: I am an Amazon affiliate and may make money on qualifying purchases.

How Do I Zero My Rifle?

It’s finally fall here in northern Alabama and the first few cool snaps have begun to give us a chill when we walk out of the house in the mornings. To many across the country this first bit of cool air signals the beginning of hunting season in the near future. For the thousands of deer hunters, fall is the time to dig out the rifle and make sure the scope is still zeroed by shooting a paper plate on a fencepost at 100 yards, give or take. For years I have taken part in this annual observance of accuracy, at least until I learned that you are better off to shoot more often and in different positions than once a fall over a truck hood. I’ll take up the cause of regular shooting in another post and stick with the basics of zeroing a rifle here. If you’d like to know more about some good practice habits, read my post on dry fire training Here.

Before handling any firearm for any purpose, please read about the four cardinal safety rules Here.

What Does It Mean To Zero A Rifle?

The simplest and most accurate definition of zeroing, or a zero, is adjusting the sights of the gun to match the location that the bullet impacts the target. It sounds very simple, and at a fixed distance, it is. However, gravity and other factors work together to make it impossible to have a fixed zero for every range. If you’ve heard the words “Kentucky Windage,” then you have heard of someone using an estimation based on distance and wind to compensate for the variables and still hit the target by aiming high, low, or to the side. Long range shooters may use telescopic sights (scopes) with exposed turrets to adjust the impact point to compensate for wind and distance as well. These skills can be very useful, but a solid base zero is where it all starts.

What Range Should I Zero My Rifle At?

If we asked this question in a message board, we would likely get almost as many different answers as there are members in the group and most of them would likely be correct given a certain situation. I’ve done a pretty good bit of shooting, both hunting and competition, and I’ll offer my findings in this post, but you may find that something else works better for you so I don’t expect or encourage anyone to take this as gospel. I propose that we zero our rifles for the range that we expect to use them. For a .22 caliber rimfire rifle used for small game such as squirrels, 25 yards or so is probably going to be pretty close to perfect. Here in Alabama, the average shot at a whitetail deer is probably just under 100 yards, however the ballistics of most high powered rifle cartridges allow the bullet to hit within a couple of inches over the first 200 yards so for my purposes, a deer rifle can be perfectly zeroed at 200 yards and will shoot 1-2 inches high at 100 yards. That’s well within the vital zone of a deer and allows me some breathing room at slightly farther shots too. An elk hunter out west might find a 300 yard shot to be common enough to zero there and make adjustments for shots closer. The military zeros are often 25 meters because the arc of the bullet’s flight makes it practical to hit a human size target in the vital zone of the torso from up close to well past 200 yards or meters. I personally zero my defensive rifles at about 200 yards and know how much to compensate to hit accurately at 300-400 yards. This setting covers me from up close to well beyond the range that I would plan on engaging targets in a defensive situation. With all that said, we have to base or zero distance on our situations and plan to adapt if need be. It isn’t set in stone and if we find ourselves needing a different setup then its a matter of a few clicks of the turret. Click the picture below for some good targets to zero your rifle or pistol with.

Types of Sights

A brief description of sight systems is helpful for us to understand how to zero our rifle, so I grouped them as broadly as I could to keep from going too far down each rabbit hole in this post.

Iron Sights: Since the rifled gun barrel was invented in the late 15th to early 16th century and vastly improved in the 18th century with the Kentucky long rifles, we have had some sort of sighting system that has consisted of one or more aiming points attached to the barrel or receiver of most guns, rifle or pistol. These sights can be as simple as a front bead at the end of the barrel to a dual aperture target sight capable of very precise adjustments such as the ones used on Olympic style competition rifles. The most common sights that we will likely find on our hunting and defensive guns will either be a buckhorn or an aperture rear sight with a post of some sort on the front. Depending on the setup, the adjustments can be limited to drifting the rear sight back and forth in its slot to correct windage and sliding up or down the ramp to correct elevation, to more precise screw type adjustment knobs. Some rifles such as AR style guns, require adjustment of the front sight post for elevation and others such as the AK style sometimes require front sight adjustment for windage. I’ll do separate posts or videos later to cover some of those.

Telescopic Sights: Often called a “scope,” a telescopic sight magnifies the image through a series of lenses just like binoculars or glasses. In fact, a rifle scope is really a telescope with a reticle of some sort to provide an aiming point and a way to adjust it. Early target style scopes, such as those made by Unertl, even had all of the adjustments made into the mounting rings which meant the body was almost identical to a telescope. Because of the advantage of magnifying the view of a target, scopes have become almost standard on most hunting and target rifles, unless the rules of a particular sport don’t allow them. Many modern scopes are variable power and have magnifications that can be adjusted by turning the eyepiece or a dial. Common hunting scopes are 3 to 9 power or 4 to 14 power. By “power” the manufacturers mean the magnification. An object in a 3 power scope appears 3 times closer than it would to the naked eye. A large number of defensive rifles are outfitted with 1 to 4 or 1 to 6 power scopes because the lower magnification helps keep the field of view wider and its easier to scan the area for threats and avoid tunnel vision. Precision and competition scopes may run from magnifications similar to hunting scopes all the way up to around 50 power magnification. While these can provide great visual clarity of a distant target, the field of view is very small up close and it can be difficult to locate a target with one of these. For a decent quality scope at a good value, click the picture below.

Red Dot/Holographic Sights: A sight system that has become almost standard in defensive weapons of all kinds in the last 20 years is the “red dot” sight. there are different ways that red dot sights work, however most of them are unmagnified and simply have a red or green illuminated dot that is the aiming point. These offer the user quick target acquisition and can be used with both eyes open so threats can be identified as early as possible. You can combine the red dot sight with an external magnifier or purchase a scope with an illuminated dot within its reticle to get a similar experience but with the option to see more distant targets too. If you want to try out a red dot sight, click the picture below for a quality sight at a reasonable price.

Basic Sight Adjustment

Because of the numerous designs of sights on the market, I will just give the basics of sight adjustment based on the adjustable rear iron sight, the standard telescopic sight, and the standard red dot sight. As I said before, some of the most prolific battle rifles we use as defensive guns have their own iron sight adjustments that I’ll cover in separate posts or videos.

Establishing Point of Impact: The first step of adjusting a sight is to determine the current point of impact. If we have a sight or scope professionally mounted, we might have the shop or gunsmith bore sight the sight to get it close before we start. Even then, a few shots are required to know for sure where you are hitting the target. If you want to save a few shots, you can click the picture below to get a bore sighting kit for yourself.

Find a Steady Rest: Either laying down on your stomach or sitting at a table or bench where you can support the rifle’s fore end and the butt stock with sand bags or a rifle rest is necessary to get an accurate point of impact. Good shooting requires consistency in grip, trigger squeeze and follow through and there are hundreds of videos and posts available for you to help perfect yours, but in person training is the best way to learn. You can use a purpose built mechanical rest like the one pictured below with some shooting bags to get a firm position to fire from. Click to picture to look closer.

Find Initial Point of Impact: Fire 2-4 rounds slowly from the steady position you have created. Sometimes it is necessary to begin this with the target as close as 25 yards to “get on paper.” No adjustments should be made until we are able to place multiple shots in an area very close to each other. If we are having trouble getting multiple shots in a small group, we need to first check our grip and firing position then check the weapon and ammunition for problems.

Making The Sight Adjustments: Again, this will vary by type, but most scopes and red dot sights will have some form of turret or screw that will adjust elevation and windage. Some iron sights will be similar, while some may have to be slid over manually and elevated with a movable ramp. The standard rule for adjusting scopes and rear portions of iron sights is to move the blade, aperture, or reticle in the direction you want the bullet to go. If I am hitting below my aiming point, I will adjust the sights or the scope dial up. (scope dials are usually marked in at least one direction, such as “up” or “right.” Most scopes will have markings that specify how much each click of the dial moves the sight at a 100 yard distance. If our scope has 1/4 inch adjustments at 100 yards and we are hitting 4 inches low, we would adjust our elevation up 16 clicks. (In theory this sounds great, but I have found that the accuracy of the click values varies based on the quality of the sight. Don’t be shocked if you have to make multiple adjustments to get your point of impact perfect.)

Fire A Group to Verify: As I mentioned, the combination of variances in the sight and human error on my part usually mean I have to make more than one adjustment. To verify the adjustments I make, I need to repeat the first step using the same rest and grip as I did to fire my first shots. I need to have the verification shots form a close group as well. This process should be repeated until we are satisfied with our zero point.

Protect the Adjustments: Sights and scopes are reaching unheard of levels of durability in the last few years, however, they can still be disturbed. By replacing the turret covers on scopes and red dot sights and tightening any set screws on adjustable iron sights, we can prevent them from being accidentally adjusted. It is also important to avoid impacts to the sight system or its mounts. Dropping a gun to the ground or banging the sight on a doorway when its slung over a shoulder both can cause a shift in the zero and the rifle should be checked for accuracy as soon as possible.

Final Points on Sight Zeroing a Rifle

As with much of the information I share, this post is more about awareness of a skill than an absolute method to follow, however there are a few notes that I feel I need to add. The first is that not everyone is a born shooter. We have different learning curves and whenever possible, using a coach or trainer can really help us progress much more quickly than trial and error. Either way, don’t get frustrated that perfect shooting isn’t instantly obtainable to you. The second is that burning powder generates a lot of heat which can cause the barrel of a rifle to deflect slightly. To get the most accurate grouping of your bullet impacts, let the gun cool off after a few shots. Firing repeatedly can have us chasing a point of impact that keeps moving and we just make things worse.

Disclosure: I am an Amazon affiliate and may make money from qualifying purchases.