Kamp-rite Tent Cot Product Review, Is It As Good As It Looks?

I’ve spent a vast majority of my life, from the time I was a teenager, working or playing outside. While that kept me in nature from time to time, it also had an adverse effect on my camping experience. I was always too busy to stop and set up a campsite and enjoy the time there or I had been outside in the elements enough for work or recreation that I wanted a shower, bed, and thermostat to control. Now as I enter my 40’s, I’m learning that not every hill and obstacle has to be climbed on a trip out in my Jeep and that not every trail has to be finished on schedule if I hike into the forest for a couple of days. Armed with that little bit of reassurance, I’m finally able to camp some and enjoy the time spent setting up and staying at camp instead of treating it like a necessary challenge of taking part in a trip that doesn’t have a motel stop scheduled.

The fact that I’ve made peace with camping by no means should indicate that I intend to be uncomfortable by choice! The outdoor industry has exploded in the last 20 plus years and become almost overwhelming, but there are some winners out there that I want to share with everyone when I find them. If you’d like to read more about some things I’ve found to make time outdoors, whether its for recreation or survival, safer and more comfortable, click Here.

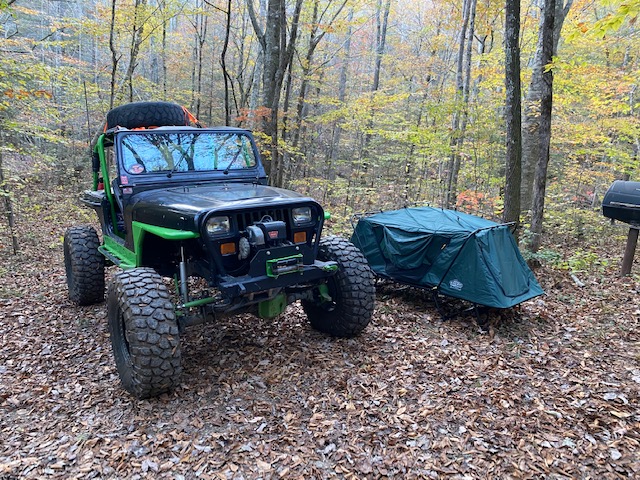
What Is A Kamp-Rite Tent Cot?

Well, with a name like “Tent Cot,” it’s pretty obvious what the basic premise is and it takes very little imagination to see what Kamp-Rite wanted to create. The general layout of the system is a tri-fold cot that has a small, one person tent sewn to it. As we unfold the cot base, the tent springs up automatically and a couple of tension rods are inserted across the top to keep the roof line tout. Though I have never set mine up as such, it also has notches in the hinges to set the cot up as a lounge chair as well.

The Benefits Of The Tent Cot Design

Camp setup in Coppinger Cove, Sequatchie, TN

A good night’s rest is not a trivial thing for mankind, in general. If the goal is to simply set up camp and stay there for the duration, we can afford a little more tossing and turning at night, but for camping as part of hunting, hiking, off-roading, exploring, and especially survival ventures, exhaustion is a severe detriment to our wellbeing. While the market is ripe with great options to sleep well at camp, the tent cot has a few features that make it one of my top choices:

The Cot Itself: The simplicity of a folding cot makes it easy to set ourselves up for a decent night’s rest. It may not be the pillow top tempurpedic mattress we have at home, but its still a bed with some support as well as cushion. The material and design of the tent cot does a great job at keeping the body up off the frame of the cot and keeps it from feeling like a night on a cheap pull out sofa bed. The next thing that any cot offers is some elevation above the ground. many of the new tents I see in most price ranges are offering a bathtub bottom of some sort that is much more waterproof than the rest of the material. That’s a huge plus on keeping ground moisture out of the tent, however it means any water that makes it inside due to condensation, rain, or wet clothing or gear stays inside the tent. I cannot think of a single time I have camped in the southeast with a tent that I didn’t manage to roll around and find at least a small puddle collected in the tent bottom. Being elevated a foot or so up keeps us from fighting that war all the time. A word of caution about cots as well as hammocks: In cold weather, make sure to insulate yourself from the bottom as well. Bridges on the highway freeze first because the cold air can reach the top and underside. Cots and hammocks allow the elements the same access.

The Tent Covering: The covering portion of the Tent Cot is very similar to tent material most of us are already used to. with zip in bug screens and solid panels to close off both sides and each end, the design allows pretty good ventilation if needed, as well as an option to close up the sides for warmth or privacy. If the weather is threatening showers, the kit comes with a rain fly that snaps into the web straps used to keep the cot securely unfolded. It does a pretty good job overall, however, like most any light tent material, it’s not monsoon proof. Either the rain, or the condensation and humidity will bring in some moisture. If I am expecting rain, I will usually fashion a lean to with a tarp that’s tapered towards the windward side of the cot. This keeps the rain from seeping in and also keeps me from stepping out into a puddle the next morning. I have the oversize version of the Tent Cot and I recommend everyone who can to get it as well. These are meant for sleeping only and don’t offer much extra room by design but the larger version gives a little more elbow room to adjust clothing and bedding without getting out.

Portability: The entire getup folds up and zips into its own storage bag. If you look closely at the photo below, you can see the black bag strapped to the roof of my jeep with an orange ratchet strap. above it is a folding camp chair in it’s carry bag. It’s easy to throw on the top of the Jeep or in the bed of the pickup and unfold when you get to camp. I can usually fumble through setting mine up in less than 5 minutes even if it has been months since I’ve used it.

Loaded up and waiting for friends at the Trials Training Center, Sequatchie, TN

Cons To the KampRite Tent Cot

I’ve been using the same Tent Cot for about 7 years now and, while I don’t camp as often as I would like, I’m also not very gentle with my gear, so lets say that I probably can call my use “average”. In that time I have only noted a couple of issues that come with tent cot camping.

Packing Size: The packed cot is 36″ by 34″ and 7″ thick according to the Kamp-Rite website. My experience is that it folds back into its case nicely but that still eats up some real estate in a vehicle. Combine the space it takes up with the weight of 32lbs, and it only takes a second to realize that we aren’t in the ultralight camping section anymore. For car camping and overlanding trips where we have means to carry a piece of gear this size, it’s great, but it might not be the ticket if packing space is at a premium.

Interior Size: I mentioned before that this is pretty much just a sleep system and as such, it doesn’t leave a ton of wiggle room inside. Expect to roll over against a cool or damp tent wall from time to time if you don’t sleep like a petrified mummy. This minor irritation can be limited by spreading out an under blanket to run up against the tent walls or wearing fabrics that don’t suck up moisture like a sponge if they happen to brush against a damp canvas. If you want or need a lot of interior space, go ahead and step up to a traditional tent and then consider a standard folding cot to place inside.

Final Thoughts on Kamp-Rite Tent Cots

Camping and survival gear is a personal preference game for everyone. Each of our camping styles varies and I have found that as an individual, there’s not just one type of camping gear that I can use for everything. With that in mind, I want to offer reviews on the practical aspects and quality of gear and the Tent Cot is a practical and well made piece of camping gear that I plan to continue using anytime my packing arrangement allows. It sets up and breaks down quickly and can be ready to throw in the vehicle at a moment’s notice. Click on any of the pictures above or the link HERE to pick one up and enjoy the benefits of tent cot camping!

Disclosure: I am an Amazon affiliate and may make money on qualifying purchases.

What Hand Tools Should I Own For Prepping and Projects?

Have you ever thought “I could do that if I only had …………. tool?” Not everyone that has a prepping mentality was afforded the opportunity to grow up around people who worked with their hands. I was fortunate to have had an opportunity to learn some basic carpentry from my father and grandfathers as a child. As a middle school student, I was able to choose “shop” as an elective my first couple of years and was introduced to a bit more equipment although at a less than organized pace. My real adventure into hand tools started when I turned 16 and got my first vehicle, a 1977 Chevy four wheel drive pickup. After two fairly expensive trips to the shop for repairs in the first few months, I was offered the choice of learning to repair the truck myself, or to figure out how to pay someone else to do it, so the choice was obvious. Getting some help from a friend led me working for his father’s dump truck business in the summers in high school. There I might work on a truck, repair a dozer, and fix a fence all in the same day. Other than a brief stint as an office manager, every job I have had has relied heavily on mechanical ability and tools. Some of those tools are specialized, but most are of the sort that we should all have at our disposal as preppers.

With all of the experience I have had, I have piled up a pretty good collection of tools, however, I still find myself needing some things I don’t have at times. There is no way for us to feasibly have every tool we will ever need, but a good basic starting list and some tool hacks will allow us to improvise our way through many situations. For a post on another great prepper tool/ skill, read my post on welding Here.

Tool Safety

After working in an OSHA regulated industrial sector business for a few years now, I have become familiar with the “safety culture” that lots of folks loathe. I understand that it can be cumbersome and time consuming, and I don’t suggest that you need to have a safety department issue permits for you to work in your garage. What I have learned from all of this exposure is that it is crucial to eliminate injuries on worksites even when there is adequate medical aid available. How much more crucial is it to us in a survival situation where we may not have access to medical facilities? A common item found on most industrial sites is a Job Safety Analysis. That’s a fancy way of saying, “What are the steps of this job, what are the hazards associated with them, and what can I do to keep from getting hurt?” Imagine the worst thing that could happen when you use a tool and think of how to prevent it. Wear some protective equipment such as gloves, boots, and safety glasses. Watch what you use as a ladder or step. These may seem silly, but an injury reduces not only our individual survivability, but that of our whole group. Grab some basic safety gear by clicking the picture below:

What Hand Tools Should I Own?

If we plan to live long term in our idyllic bug out cabin deep in the woods, we have to figure on doing many tasks by hand simply because we won’t likely have constant electrical power from the grid. If we really wanted to live the off grid life to the fullest, there are some companies that specialize in hand powered devices. If we visit www.lehmans.com, we can find everything from washing machines to blenders that are hand or foot powered. It’s a great option to consider, but for now, I’d like to stick to the necessities.

Hammer: There may be no more ancient or universal tool than a hammer. As our ancestors learned the basics of physics and how attaching a handle to a striking object gave it more leverage and velocity to increase the power of the blow, the hammer was born and has since been adapted to many specialized needs. If I can only have one hammer, it would be a claw style framing hammer, but if we have the option, I believe having at least a couple of ball-peen hammers is a great addition to all tool sets. Click below for a quality claw hammer and hammer set:

Saws: Saws run almost as wide a gamut as hammers do when specialized purposes are considered, especially when fine woodwork is considered. For the majority of us, we can survive with a slightly cruder fit and finish in a survival situation, so I’ll use other posts to cover more specialized saws. Here are the basics that I would like to always have. A good sharp handsaw for cutting lumber and doing basic carpentry work. A medium to large bow saw for cutting limbs and firewood that can also double as a bone saw when butchering larger game. A hacksaw for cutting metals and plastics for fabrications and plumbing jobs. Click the pictures below for some handy saws to have:

Axe: I am ashamed to admit that my proficiency with an axe is lacking, considering the thousands of saplings that I massacred as a youngster. What I do know is that a quality axe that is cared for is an heirloom tool that can be handed down for generations. Regardless of the quality, we should try to keep our axes clean and sharp for the best performance when needed. Look for high quality axe reviews in the future here and on my YouTube Channel, but for now, I’ll link this value priced axe from Cold Steel in the picture below to get us started.

Sledge Hammer/Maul: I would rather have one of each, but most splitting mauls have a bit on one side and a flat hammer face on the other to drive wedges into logs. Using a proper splitting maul will make much shorter work of splitting a pile of firewood from heavy logs and a large 8 to 16 lb sledge hammer can make things move that otherwise would be frozen in place. Click the picture below for an 8 lb version that is a pretty good balance for most of us.

Brace and Bit: A hand operated drill is one of the many tools that the pioneers used as they moved west and moved from tents and improvised shelters into cabins with furniture. Using various size bits to auger through wood, we can anchor logs together for fences and walls by boring a hole and driving a wooden dowel or metal pin or nail through them. For frontier furniture, most pieces were assemble using drilled holes and dowels for fasteners. Click the picture below for a model with a set of smaller bits to start out with then look at adding the larger auger style bits as you have funds:

Knives: One of the tool classifications that we can readily get a variety in is cutlery. I would want to have knife designs for butchering, cooking, and utility use at hand when needed. I’ve covered pocket knives in other posts such as the one Here, so I’ll stick to a kitchen knife set for this post.

Shovel: If I only have one, I’d like to have a round nosed shovel that can dig more readily. If I have room and money to add a flat nose shovel for scraping and scooping, It will be there as well.

Pick Axe: Not all ground yields easily enough to the shovel and has to be dug out with more deliberate means. A good pick axe can break up tough earth with the sharp point and cut away at the banks with the wide blade on the opposite side.

Ladder: We have to asses our personal needs for ladder choice, but I recommend having a step ladder tall enough to reach anything inside your home but still short enough to set up as well as a taller step or extension ladder that will reach anything you may have to access outside your home. When purchasing ladders, look closely at the rated capacity. A larger person like myself can easily break an underrated ladder. Click below for a handy portable option that can reach lots of things but collapse into a small package:

Socket Set: A basic standard and metric socket set from 1/4 inch drive to 1/2 inch drive can make many tasks simpler than they would otherwise be if we are only armed with wrenches.

Wrench Set: On the flip side, there are many places that a wrench will fit that a socket never could. For wrenches I would like to have a set of standard and metrics in common small to medium large sizes, roughly matching the sockets I have. In addition, I like having a few different size adjustable wrenches for quick work on bolts and nuts that aren’t super tight. Two or three pipe wrenches are a God sent in plumbing and some equipment repair situations as well. Click below for a good set of all three types:

Pliers: If we can’t hold it still, it’s mighty hard to fix it! Pliers come in many sizes and shapes so a variety pack of quality pliers usually gives us a reasonable chance at getting the job done. I personally like to have a couple of each so grabbing two sets is great if your budget allows. Don’t overlook locking pliers like ViseGrip brand when adding to your toolbox as well.

Screw Drivers: A full set of slotted and phillips head drivers will cover a large portion of our needs, however a multi driver with a selection of specialty tips is a great tool to have for allen and torx head bolts and screws.

Chisels/Punches: Having tools that we can use to harness the power of a hammer blow makes many jobs much simpler. Chisels can be used to cut and to drive bolt heads and flanges around to loosen them and punches can help us drive out pins, bolts, and dowels to disassemble things.

Pry Bar: Leverage is one of the most used forms of mechanical advantage. A quality set of pry bars allows us to place a lot of pressure into a small area to move or secure objects.

Files: For sharpening and shaping metals, such as axes, a file is indispensable. They are available in several shapes and coarseness ranges to cut deeply or smooth to a fine edge.

Jack: While the jacks in our cars can help some, a longer lift, ratcheting style jack is extremely handy around the house or homestead. The ratcheting jacks by Hi Lift have been a staple in the off road and homesteading community for years because they can double as lifts, winches, and clamps depending on your needs. Just remember that the pins and ratcheting mechanism of these jacks need to be kept clean and lubricated to work safely. Click below for one of the most useful jacks ever designed:

Shears/Loppers: Scissor, shears, and pruning tools make basic property maintenance possible. Whether we need to cut back a fence row to fix a broken strand of barbed wire or open up a shooting lane to have a clean shot to harvest game animals for food. shears and loppers are a must. I believe that you’ll agree that a few pair of decent scissors have so many uses that we need not waste time describing them. Click the picture for a shear and lopper set:

Vise: One of the challenges of many mechanical jobs is to keep your work still while placing some sort of force against it. While I have covered pliers and vise grips to hold parts, they still don’t keep a part locked to a fixed point. A modest sized vise anchored to a post, heavy table, or even a solid stump will make it much easier to address many homestead and farm repair tasks. Click the picture for a reasonably priced model:

Tool Kits: Manufacturers and retailers do a pretty good job of putting together tool kits that have a lot of things in them. As warehouse building supply stores prepare for the holidays, we begin to see “mechanic’s tool sets” available at great prices. They are usually an excellent value and I offer only one caveat; When buying a kit, compare it to the individual tools or sets that you would purchase otherwise. I have found that many kits seem to leave out a few sizes of wrenches or sockets that we eventually need so we should pick up a few of those as individual items to have a complete set.

Final Thoughts on Hand Tools

The list compiled in this post isn’t all inclusive by any means, nor is everything on it required to survive. Most of us aren’t financially able to run down a list like this and get everything at once, so don’t panic and it’s almost guaranteed that, as a prepper group, you and those you have around you can combine resources to have most of the tools on the list already. If you happen to be out around flea markets and garage sales, or online in the various internet marketplaces, look for quality used tools such as Craftsman, Stanley, and the like and you may find some great bargains on tools that are often better quality than can be purchased new!

Disclosure: I am an Amazon affiliate and may make money on qualifying purchases.