
Another suggestion from a good friend of mine led me to post this to my blog and I’ll likely make a video about it as well. Many of the basic mechanical skills that were needed by every motorist 20 years ago have been lost to a combination of much better products and engineering as well as to the numerous roadside assistance programs. My goal is to bring practical preparedness information to everyone with this blog and my YouTube channel before I get too focused on the less likely survival scenarios. Basic home and auto preparedness is about as universal of a place that we can start. If we took time to check, we would all probably find that with our car insurance, cell phone plans, and even some credit cards, we have the opportunity to sign up for some form of roadside assistance plan. Many of us choose to join AAA, which is the most well known of the roadside providers. All of these can be a benefit, but circumstances may make it impossible to contact them or for them to reach you to help. You can see some of the other things to consider having with you in my post on car preparedness products by clicking here: https://nickspreparedness.com/2020/07/21/how-to-prepare-for-survival-in-your-car/
Safety While Changing Tires
Just because you know how to handle this roadside inconvenience doesn’t mean that it is always wise to undertake. Having worked on the roadsides for almost 20 years in the towing and recovery business, I have had several near misses and know of many who weren’t so lucky. It is almost weekly that I see a “operator down” or “officer down” post of my newsfeed which reminds me just how dangerous it is to be on the roadside. With than in mind, I want to encourage everyone to remember that a ruined tire or damaged wheel may be expensive, but we cannot put a price on the death or serious injury of ourselves or a loved one. If at any time you aren’t in a safe area, don’t hesitate to call for help or limp on the flat down the shoulder to an exit or safe place out of traffic. I’ll bring up other safety concerns as we go through the directions that follow.
What do I Need to Change My Tire?
Depending on our level of experience with automotive tire changes, one of the first things that we need is our vehicle owner’s manual. In the modern age of engineering a use for every space can lead manufacturers to tuck spare tires, jacks, and lug wrenches in all manner of nooks and crannies. Unless we have already changed a tire on our vehicle, a good place to start is reading the section on tire changes in the manual. This will provide the location of the spare and all of the ancillary equipment needed to perform the repair as well as some less obvious, vehicle specific information. For example, I helped change a tire on a Mercedes sedan one evening and the car wouldn’t move afterwards. After reviewing the instructions in the manual, I found that there was another set of lug bolts (this model used bolts instead of studs and lug nuts) that were shorter and worked on the thinner steel spare wheel. The longer ones used on the factory wheel would bottom out and lock up the hub. We could have saved a little sweat and plenty of unbecoming language if I had looked up the instructions first. That aside, the following is a basic list of tire changing necessities.
Spare Tire: While it seems obvious, its all to common to find a spare to be flat when we need it. Spare tires are the forgotten heroes that never get the attention they deserve until we need them. Make it part of your regular vehicle maintenance to have your spare tire checked. A few more dollars during a tire rotation and balance could save you from having a flat and a spare flat. Also, used cars sometimes don’t get the spare tire left with them. If you buy a new or used car, become familiar with the location and condition of your spare tire and keep it maintained. One more important note on spares, since many cars now have a compact spare, often nicknamed a donut, pay close attention to the instructions for using the tire. These undersized tires are usually rated for only a certain speed and distance and are usually just a means to get you to a repair shop.
Jack: Unless you are capable or superhuman strength or have a passenger that is, you are going to need a mechanical or hydraulic means to lift the corner of the car with the flat. A quick flip to the owner’s manual will yield the location of the jack and the handle/lug wrench. Most vehicles now use the lug wrench as part of a crank system to raise and lower the jack and may have several extension pieces that allow you to extend the reach to farther under the vehicle. Also, in the manual we find the manufacturers jack placement locations where we can lift the car without damage to the body or suspension components. Factory jacks are made for emergency use and usually are very minimal. If you have room in your trunk or truck bed I strongly recommend having a more practical hydraulic jack which is much safer and easier to use. You can find one by clicking the picture below:
Hydraulic Floor Jack Link:

A word of caution about jacks, as with anything manmade, they can fail unexpectedly. Never place any part of your body under the vehicle while it is off the ground.
Lug wrench: The lug wrench or “tire iron” is the tool used to remove the lug nuts from the hub. In most cars, it is a simple and sturdy steel bar that works fairly well, however damaged or overtightened lug nuts can make removal difficult. If your vehicle has aftermarket wheels, you might find that the size of the lug nut has changed and need to carry a matching lug wrench or socket and breaker bar in the correct size. Take a look at the following link to find a suitable lug wrench for your car or truck. This model from Dorman can be used with multiple 1/2″ drive sockets to fit almost any lug size.
Best Universal Lug Wrench:

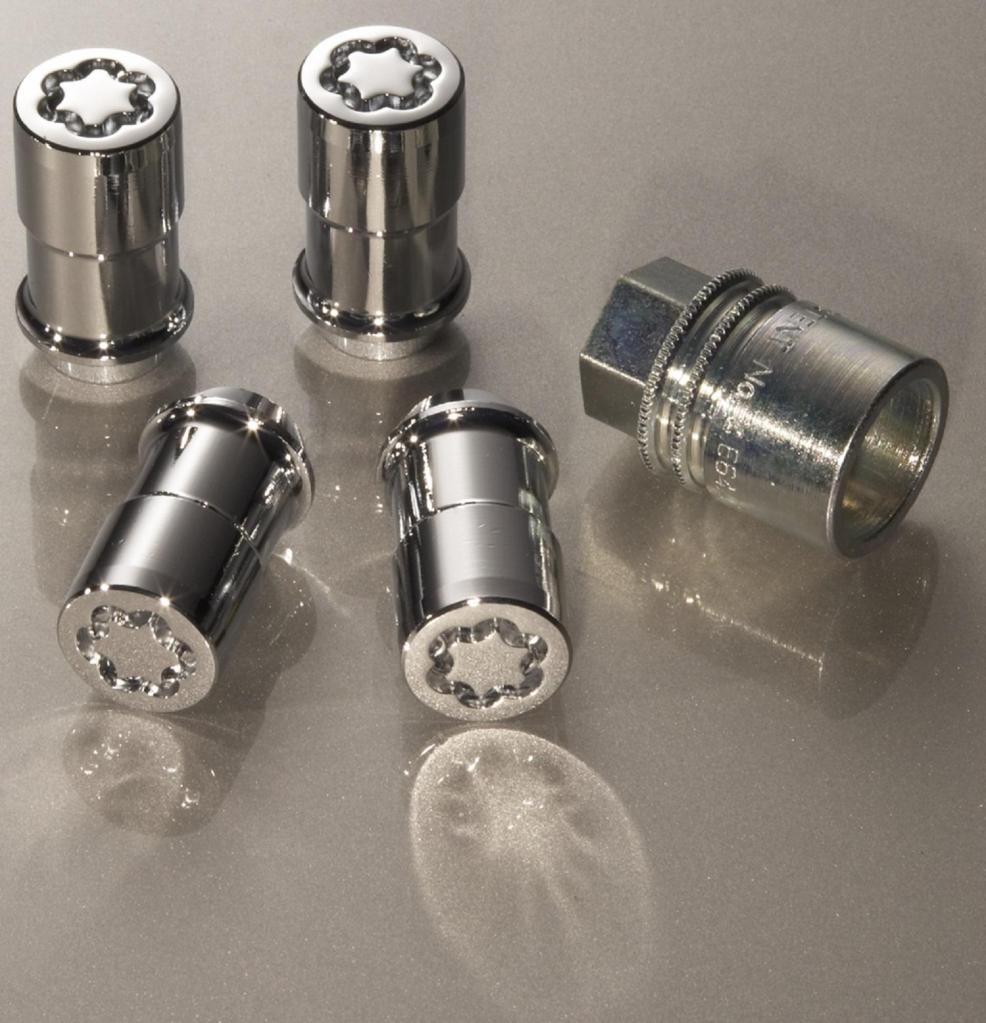
Lug Nut Lock Key: Many factory and aftermarket lug nut sets will have one nut per wheel that has a round surface and a grooved face that matches up with a “Key” that must be placed in the lug wrench to turn it. The intent is to keep someone from stealing the wheel since there is one lug they supposedly cannot remove without the “key.” If you chose to purchase or keep these, take extra care to place the key in a location inside the vehicle where it can be found. Some Pickups with under bed spare tire mounting now require a similar key to lower the spare. Make sure you know if you need one of those and keep it likewise stored. Below is a picture of a typical locking lug nut design:
What Should I Do Before Changing My Tire?
Other than having a flat, there are a few things we should do to make sure we are ready to swap out a blown or flat tire. First, we need to find a safe location to perform the work. Next, we need to place the car in park or in first gear if it’s a manual transmission and set the parking brake. The use of some sort of “scotch” is also a great additional safety precaution on one of the tires that isn’t flat. Also look at the ground where you plan to place the jack. Pavement, concrete, or compacted gravel is best, but some dirt surfaces can support a jack if they are dry and dense, but a soft surface will allow the jack to sink into the ground and possibly cause the car to slide off. Keeping some sort of wooden pad in the vehicle takes up little space but can be a big help when using a jack on less than solid surfaces. Below are some inexpensive wheel chocks that are also useful when parking on a hill or for chocking trailer tires.
Wheel Chocks:

Loosening the Lugs: Before lifting the vehicle, we need to take advantage of the traction of the flat tire to hold the hub still while we loosen the lugs slightly. Using the lug wrench, we need to make sure we have a solid grip on the nut and turn them in a counter clockwise direction. This may take significant force and should always be done pushing down away from our bodies with the wrench. Once all of the lug nuts have been loosened slightly, we can lift the vehicle.
Jacking The Vehicle: As the vehicle is lifted the flat tire will rise clear of the ground, however continue lifting the vehicle until the spare tire will have room to replace it. Doing so limits the time that there is not a tire on the hub and the car can fall to the ground if the jack fails.
Changing the Tire: Remove the lug nuts from the hub. They should be fairly easy to remove now. Keeping your body clear of the vehicle, remove the flat and place the spare tire and wheel back on the hub. Note that some spares will have extra holes in the wheel, if yours is like this, keep turning it until you find a set that line up with your wheel studs. Tighten all lug nuts hand tight and snug them with the lug wrench. At this point we can lower the vehicle onto the spare tire and remove the jack.
Torquing the Lug Nuts: Unless you have a torque wrench, this isn’t an exact science, but tighten the lugs in a clockwise direction with the lug wrench pushing down away from you with the help of your body weight. Tightness will vary greatly according to the person’s size and strength so getting directly to a tire shop is a good idea even if we have a full-size spare. To help with making sure you can loosen and tighten the lugs enough to safely travel on the tire, you might want to consider an inexpensive 12 volt impact wrench like this one:
12 volt Impact Wrench Link:

Advice on Changing Your Own Tire:
As with almost any exercise in preparedness, changing a tire is best practiced in the safety of the driveway at home well before it is needed in an emergency. This post is fairly inclusive, but cannot cover every vehicle or situation. Please take time to at least read your owner’s manual and locate your tools, jack, and spare tire, as well as learn how to remove any hub caps or covers that might conceal your lug nuts.

Disclosure: I am an Amazon affiliate and make money on qualifying purchases.

Pingback: What Should I Check on My Car Before A Road Trip? | Nick's Preparedness