Category Archives: Prepper Skills

How Do I Protect Myself From Ticks and Other Insects?

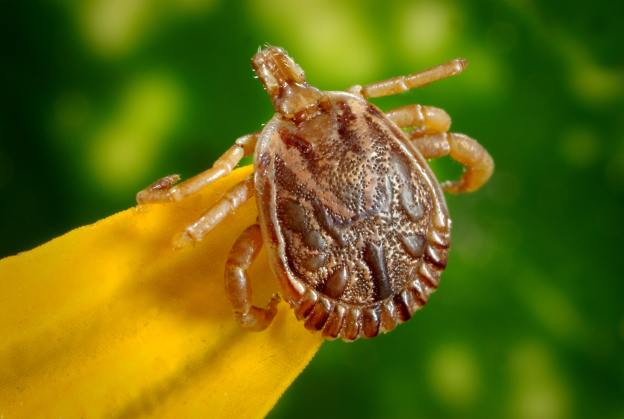
Why Should We Worry About Ticks and Other Insects?

In my late 20’s I got what I was certain was one of my regularly scheduled quarterly sinus infections. Symptoms were textbook for me, a little tired and run down one evening, woke up the next day stuffy with a cloudy head, the next day sinuses started draining and causing chest congestion. Off to the Urgent Care for a Z-pack and a steroid shot. After several more days with no sign of improvement, I was considering going back to the doctor for another round of antibiotics when i noticed some tingling in my feet and hands. I ignored it and tried to get some rest. That evening I woke up around 11 pm and was unable to walk and barely able to use my hands. I also had red spots all over my feet and legs. I got someone to take me to the Emergency Room where the doctors at first wanted to send me home and refer me to a dermatologist. After my less than polite objection, they involved a few more doctors and came up with a diagnosis. I had Rocky Mountain Spotted Fever from a tick bite that was hardly noticeable. After conferring with the infectious disease specialist, I was told that the tingling feeling was actually paralysis setting in on my extremities and within 24 to 48 more hours, without treatment, it would have paralyzed my internal organs and killed me.

While my story isn’t very common, adding the other tick borne illnesses such as lyme disease as well as the multiple mosquito transmitted illnesses to the pot makes it important to consider insect repellent to your list of prepping items. Beyond the actual illnesses, insect bites are a potential infection site as well as just plain irritating. If you have never gotten a good case of “chiggers” on you, consider yourself among the fortunate.

What Can I Use Protect Myself From Insects?

I will divide insect repellent into two types for the purpose of this blog post. The first type is the wearable repellent. The other is the stationary repellent. Some types will overlap the two and I’ll point that out.

Wearable Insect Repellents

It’s not officially summer here in the South until you smell the strong scent of “Deep Woods Off” on every kid playing in the yard. My daughter is an absolute buffet for mosquitoes if she so much as steps outside without repellent on so she gets fogged with spray on any exposed skin. Wearable repellents let you take the repellent with you as you go and are the best choice if you are on the move, so consider these for vehicle and bug out bags. There are lots of choices today and some may fit our needs more than others, so consider this another “mission dependent” item and consider having a few different choices available. If you are interested in what else you might want to consider for your go bag or bug out bag, take a look at my post here.

Deet Repellent Sprays: Developed in the mid 1940’s for use by the United States Army, Deet is a chemical compound that confuse an insect’s olfactory senses and “blind” them to the substances in human sweat and breath that attract the little blood suckers to us in the first place. While it works great at keeping you from being a bug’s dinner, we have to be careful when we apply Deet repellents. It can act as a solvent and is destructive to some plastics and coatings. If you have ever heard the life hacks about using “Off” brand spray to clean headlight lenses, this is why it works. It chemically melts the top layer of the plastic, so think of what this can do to the string on your hunting bow or the seams of a rain suit before you douse yourself with the stuff. Grab some by clicking the picture below.

Permethrin Repellent Sprays: Discovered in the early 1970’s, Permethrin is actually an insecticide that has been used to treat crops and large areas of infestation. It is used as a repellent to insect bites by killing or disabling them before they are able to bite. As an insecticide, it is closely monitored since it is a broad spectrum chemical and kills bugs indiscriminately including beneficial insects like honey bees. For personal use, however, we are much less concerned with the bug mortality rate when it comes to the ones actually trying to eat us. It’s a solid option for hunting too since it is not going to melt our synthetic and plastic gear while we wear it. Pick some up by clicking the picture below:

Repellent Treated Clothing: I’m not sure where this technology began, but I first heard of it in the camouflage hunting clothing industry. Hunting seasons vary in actual calendar season across the world. Here in the southern United States, we have hunting seasons that start in early fall and in early to mid spring. An opining day dove hunt in early September or a late season turkey hunt when the woods are warming and greening up will expose us to bugs that had to have been stowaways because Noah wouldn’t have knowingly let them near the Ark! Regardless of who deserves credit for the idea, we now have outdoor sporting and work clothing made by several companies that is impregnated with one or more repellents when they are made. One consideration to have about these, though, is that the effectiveness is reduced over many washes. The maker usually has a number of washes specified in the product information. Click to take a look at the shirts below:

Personal Electronic Repellent Devices: Themacell brand devices are a handy option that provide insect free environments without having to spray ourselves with a chemical. They work by heating up an insect repellent cell that emits a chemical scent that works much like the sprays do. You can get one by clicking the picture below:

Stationary Insect Repellents

While my classifications might not be the industry standards for pest control, I think that they adequately explain the types of repellents we commonly use. The Stationary repellents are those that treat an area, not a person, therefore you are protected in the treated area, but not when you leave it. These are a great choice for general outdoor activity that is confined to an area such as a camp site, back yard, or a patio.

Whole Yard Repellent Treatments: These treatments are usually done by professional pest control services or by purchasing a product like the spray pictured below. Most of these products are made to attach to a garden hose and self dilute as the water flows through the nozzle and out on the yard. Professional or DIY products can make a big difference in how enjoyable your back yard or work area around a cabin will be when the temperatures get warmer.

Electronic Repellent Devices: This is one product that falls into both classes since it can be carried with us or used to create a perimeter around us to create a zone of protection. The ones below are set up to provide stake out around a patio or camp site. Click the picture to look closer:

Citronella Candles and Torches: If Deet containing aerosols were the smell of the summer days of my youth, Citronella was the smell of summer nights around the patio or porch. Versions of this waxy, oily substance ranged from galvanized buckets filled with a candle to tiki torches that were filled with a citronella lamp oil. The oil is derived from several varieties of lemongrass so its probably the most “natural” substance on this list. It has a distinct smell and you might find it does a great job for your ourdoor setup. Try some of the bucket candles by clicking the picture.

Insect Repellent Safety

If we take a quick look at the description of all of the types of insect repellents listed in this post, the word “chemical” is used repeatedly. Even natural options, while unprocessed, are still chemicals and like the man made and synthetic chemicals, they can also cause allergic reactions in some people. We should always make sure that we experiment with any new chemical we use, no matter the application, to make sure we aren’t allergic or have some other negative response to it before relying on a product daily.

Also be very cautious when using any chemical product around children or pets. Permethrin, for instance, is toxic to cats.

While it won’t stop everything we might encounter, another option is always to use a mosquito net like the one below. Look closely when purchasing though, some are impregnated with chemical repellents. Click the picture to get one:

Disclaimer: I am an Amazon Affiliate and I may make money on qualifying purchases.

How Do I Change A Flat Tire?

Another suggestion from a good friend of mine led me to post this to my blog and I’ll likely make a video about it as well.   Many of the basic mechanical skills that were needed by every motorist 20 years ago have been lost to a combination of much better products and engineering as well as to the numerous roadside assistance programs.  My goal is to bring practical preparedness information to everyone with this blog and my YouTube channel before I get too focused on the less likely survival scenarios. Basic home and auto preparedness is about as universal of a place that we can start.  If we took time to check, we would all probably find that with our car insurance, cell phone plans, and even some credit cards, we have the opportunity to sign up for some form of roadside assistance plan.   Many of us choose to join AAA, which is the most well known of the roadside providers.  All of these can be a benefit, but circumstances may make it impossible to contact them or for them to reach you to help.   You can see some of the other things to consider having with you in my post on car preparedness products by clicking here: https://nickspreparedness.com/2020/07/21/how-to-prepare-for-survival-in-your-car/

Safety While Changing Tires

Just because you know how to handle this roadside inconvenience doesn’t mean that it is always wise to undertake.   Having worked on the roadsides for almost 20 years in the towing and recovery business, I have had several near misses and know of many who weren’t so lucky.   It is almost weekly that I see a “operator down” or “officer down” post of my newsfeed which reminds me just how dangerous it is to be on the roadside.  With than in mind, I want to encourage everyone to remember that a ruined tire or damaged wheel may be expensive, but we cannot put a price on the death or serious injury of ourselves or a loved one.  If at any time you aren’t in a safe area, don’t hesitate to call for help or limp on the flat down the shoulder to an exit or safe place out of traffic.   I’ll bring up other safety concerns as we go through the directions that follow.

What do I Need to Change My Tire?

Depending on our level of experience with automotive tire changes, one of the first things that we need is our vehicle owner’s manual.   In the modern age of engineering a use for every space can lead manufacturers to tuck spare tires, jacks, and lug wrenches in all manner of nooks and crannies.  Unless we have already changed a tire on our vehicle, a good place to start is reading the section on tire changes in the manual.   This will provide the location of the spare and all of the ancillary equipment needed to perform the repair as well as some less obvious, vehicle specific information.   For example, I helped change a tire on a Mercedes sedan one evening and the car wouldn’t move afterwards.   After reviewing the instructions in the manual, I found that there was another set of lug bolts (this model used bolts instead of studs and lug nuts) that were shorter and worked on the thinner steel spare wheel.  The longer ones used on the factory wheel would bottom out and lock up the hub.   We could have saved a little sweat and plenty of unbecoming language if I had looked up the instructions first.   That aside, the following is a basic list of tire changing necessities.

Spare Tire:    While it seems obvious, its all to common to find a spare to be flat when we need it.  Spare tires are the forgotten heroes that never get the attention they deserve until we need them.  Make it part of your regular vehicle maintenance to have your spare tire checked.  A few more dollars during a tire rotation and balance could save you from having a flat and a spare flat.  Also, used cars sometimes don’t get the spare tire left with them.   If you buy a new or used car, become familiar with the location and condition of your spare tire and keep it maintained.  One more important note on spares, since many cars now have a compact spare, often nicknamed a donut, pay close attention to the instructions for using the tire.   These undersized tires are usually rated for only a certain speed and distance and are usually just a means to get you to a repair shop. 

Jack:  Unless you are capable or superhuman strength or have a passenger that is, you are going to need a mechanical or hydraulic means to lift the corner of the car with the flat.  A quick flip to the owner’s manual will yield the location of the jack and the handle/lug wrench.  Most vehicles now use the lug wrench as part of a crank system to raise and lower the jack and may have several extension pieces that allow you to extend the reach to farther under the vehicle.   Also, in the manual we find the manufacturers jack placement locations where we can lift the car without damage to the body or suspension components. Factory jacks are made for emergency use and usually are very minimal. If you have room in your trunk or truck bed I strongly recommend having a more practical hydraulic jack which is much safer and easier to use. You can find one by clicking the picture below:

Hydraulic Floor Jack Link:

A word of caution about jacks, as with anything manmade, they can fail unexpectedly.  Never place any part of your body under the vehicle while it is off the ground.  

Lug wrench:   The lug wrench or “tire iron” is the tool used to remove the lug nuts from the hub.   In most cars, it is a simple and sturdy steel bar that works fairly well, however damaged or overtightened lug nuts can make removal difficult.  If your vehicle has aftermarket wheels, you might find that the size of the lug nut has changed and need to carry a matching lug wrench or socket and breaker bar in the correct size. Take a look at the following link to find a suitable lug wrench for your car or truck. This model from Dorman can be used with multiple 1/2″ drive sockets to fit almost any lug size.

Best Universal Lug Wrench:

Lug Nut Lock Key:   Many factory and aftermarket lug nut sets will have one nut per wheel that has a round surface and a grooved face that matches up with a “Key” that must be placed in the lug wrench to turn it.  The intent is to keep someone from stealing the wheel since there is one lug they supposedly cannot remove without the “key.”   If you chose to purchase or keep these, take extra care to place the key in a location inside the vehicle where it can be found.   Some Pickups with under bed spare tire mounting now require a similar key to lower the spare.  Make sure you know if you need one of those and keep it likewise stored. Below is a picture of a typical locking lug nut design:

One type of locking lug nut we may find on our cars

What Should I Do Before Changing My Tire?

Other than having a flat, there are a few things we should do to make sure we are ready to swap out a blown or flat tire.   First, we need to find a safe location to perform the work.   Next, we need to place the car in park or in first gear if it’s a manual transmission and set the parking brake.   The use of some sort of “scotch” is also a great additional safety precaution on one of the tires that isn’t flat.  Also look at the ground where you plan to place the jack.   Pavement, concrete, or compacted gravel is best, but some dirt surfaces can support a jack if they are dry and dense, but a soft surface will allow the jack to sink into the ground and possibly cause the car to slide off.   Keeping some sort of wooden pad in the vehicle takes up little space but can be a big help when using a jack on less than solid surfaces. Below are some inexpensive wheel chocks that are also useful when parking on a hill or for chocking trailer tires.

Wheel Chocks:

Loosening the Lugs:   Before lifting the vehicle, we need to take advantage of the traction of the flat tire to hold the hub still while we loosen the lugs slightly.   Using the lug wrench, we need to make sure we have a solid grip on the nut and turn them in a counter clockwise direction.  This may take significant force and should always be done pushing down away from our bodies with the wrench.   Once all of the lug nuts have been loosened slightly, we can lift the vehicle.

Jacking The Vehicle:  As the vehicle is lifted the flat tire will rise clear of the ground, however continue lifting the vehicle until the spare tire will have room to replace it.   Doing so limits the time that there is not a tire on the hub and the car can fall to the ground if the jack fails.

Changing the Tire:   Remove the lug nuts from the hub.  They should be fairly easy to remove now.  Keeping your body clear of the vehicle, remove the flat and place the spare tire and wheel back on the hub.  Note that some spares will have extra holes in the wheel, if yours is like this, keep turning it until you find a set that line up with your wheel studs.   Tighten all lug nuts hand tight and snug them with the lug wrench.  At this point we can lower the vehicle onto the spare tire and remove the jack.  

Torquing the Lug Nuts:  Unless you have a torque wrench, this isn’t an exact science, but tighten the lugs in a clockwise direction with the lug wrench pushing down away from you with the help of your body weight.   Tightness will vary greatly according to the person’s size and strength so getting directly to a tire shop is a good idea even if we have a full-size spare. To help with making sure you can loosen and tighten the lugs enough to safely travel on the tire, you might want to consider an inexpensive 12 volt impact wrench like this one:

12 volt Impact Wrench Link:

Advice on Changing Your Own Tire:

As with almost any exercise in preparedness, changing a tire is best practiced in the safety of the driveway at home well before it is needed in an emergency. This post is fairly inclusive, but cannot cover every vehicle or situation. Please take time to at least read your owner’s manual and locate your tools, jack, and spare tire, as well as learn how to remove any hub caps or covers that might conceal your lug nuts.

Disclosure: I am an Amazon affiliate and make money on qualifying purchases.